How To Convert A Website Into An Android App?
Converting a website into an Android app can bring a multitude of benefits for both the website owner and its users. A native app provides a more seamless and optimized user experience, as it can be customized to better fit the specific needs and features of mobile devices. Additionally, having a presence in the Google Play Store can help increase the visibility and reach of your website.

In this article, we’ll take a comprehensive look at the steps involved to convert a website into an Android app.
Step 1: Choose The Right Tool For Conversion
The first step in converting your website into an Android app is choosing the right tool for the job. There are several options available, each with its own pros and cons.
● WebView:
A WebView is a native Android component that allows you to display web content within an app. If your website is relatively simple and does not require access to native device features, this option may be the most straightforward. You can wrap your website in a WebView and then distribute the app through the Google Play Store.
● Cordova (PhoneGap):
Cordova is an open-source platform that allows you to build native apps using HTML, CSS, and JavaScript. This option is ideal if you want to access native device features, such as the camera or GPS, and want to build a more feature-rich app. Cordova wraps your website in a native app container, making it possible to access these device features.
● Xamarin:
Xamarin is a cross-platform app development tool that allows you to build native apps for Android, iOS, and Windows using C#. If you are already proficient in C# and want to build a fully-featured, native app, this may be the right choice for you.
● React Native:
React Native is a framework for building native apps using JavaScript and React. It allows you to write code once and run it on multiple platforms, including Android. If you are already familiar with React and JavaScript, this option can provide a more streamlined development experience.
Step 2: Determine The Desired Features Of Your App
Once you’ve chosen a tool, it’s important to determine the features you want to include in your app. Some common features to consider include:
● Push Notifications:
The ability to send notifications to users even when they’re not using the app can be an important engagement tool.
● Offline Mode:
Allowing users to view content even when they are offline can improve the overall user experience.
● Access To Native Device Features:
Accessing the camera, GPS, and other native device features can add value to your app and enhance the user experience.
● Custom Design:
A custom design can help your app stand out in the Google Play Store and provide a unique, branded experience for your users.
Step 3: Design Your App
Once you’ve determined the features you want to include in your app, it’s time to design it. Depending on the tool you chose, the design process may differ.
If you’re using Cordova or Xamarin, you can use HTML, CSS, and JavaScript to design your app. You’ll have the ability to create custom layouts, use CSS to style your app, and add interactivity using JavaScript.
If you’re using React Native, you’ll use React components to design your app. The components can be customized to match your brand and design style.
Step 4: Build Your App
With the design of your app complete, it’s time to start building it. If you’re using Cordova or Xamarin, you’ll use their respective development environments to build your app. For Cordova, you’ll use a command-line interface to run the build process, while Xamarin provides a visual development environment that you can use to build your app.
If you’re using React Native, you’ll use a command-line interface to run the build process. Once the build process is complete, you’ll have a native Android app that you can run on an emulator or a physical device.
Step 5: Test Your App
Before distributing your app to the Google Play Store, it’s important to thoroughly test it. This will help ensure that your app works as expected on a variety of devices and screen sizes. You can use an emulator or a physical device to test your app.
Step 6: Distribute Your App
With your app built and tested, it’s time to distribute it. To distribute your app through the Google Play Store, you’ll need to sign up for a Google Play Developer account. This account will allow you to publish your app and manage it through the Google Play Console.
Once you’ve signed up for a Google Play Developer account, you’ll need to prepare your app for distribution. This involves creating an APK (Android Package Kit) file, which is the file format used for Android apps. You’ll also need to provide information about your app, such as its description, screenshots, and promotional graphics.
Step 7: Monitor And Update Your App
Once your app is live in the Google Play Store, it’s important to monitor its performance and make updates as needed. You can use the Google Play Console to monitor the number of downloads and reviews, as well as to respond to user feedback.
You should also plan to release updates to your app on a regular basis. This will help keep your app relevant and up-to-date, as well as address any bugs or performance issues.

Source: Statista
Developing An Android App: A Comprehensive Guide
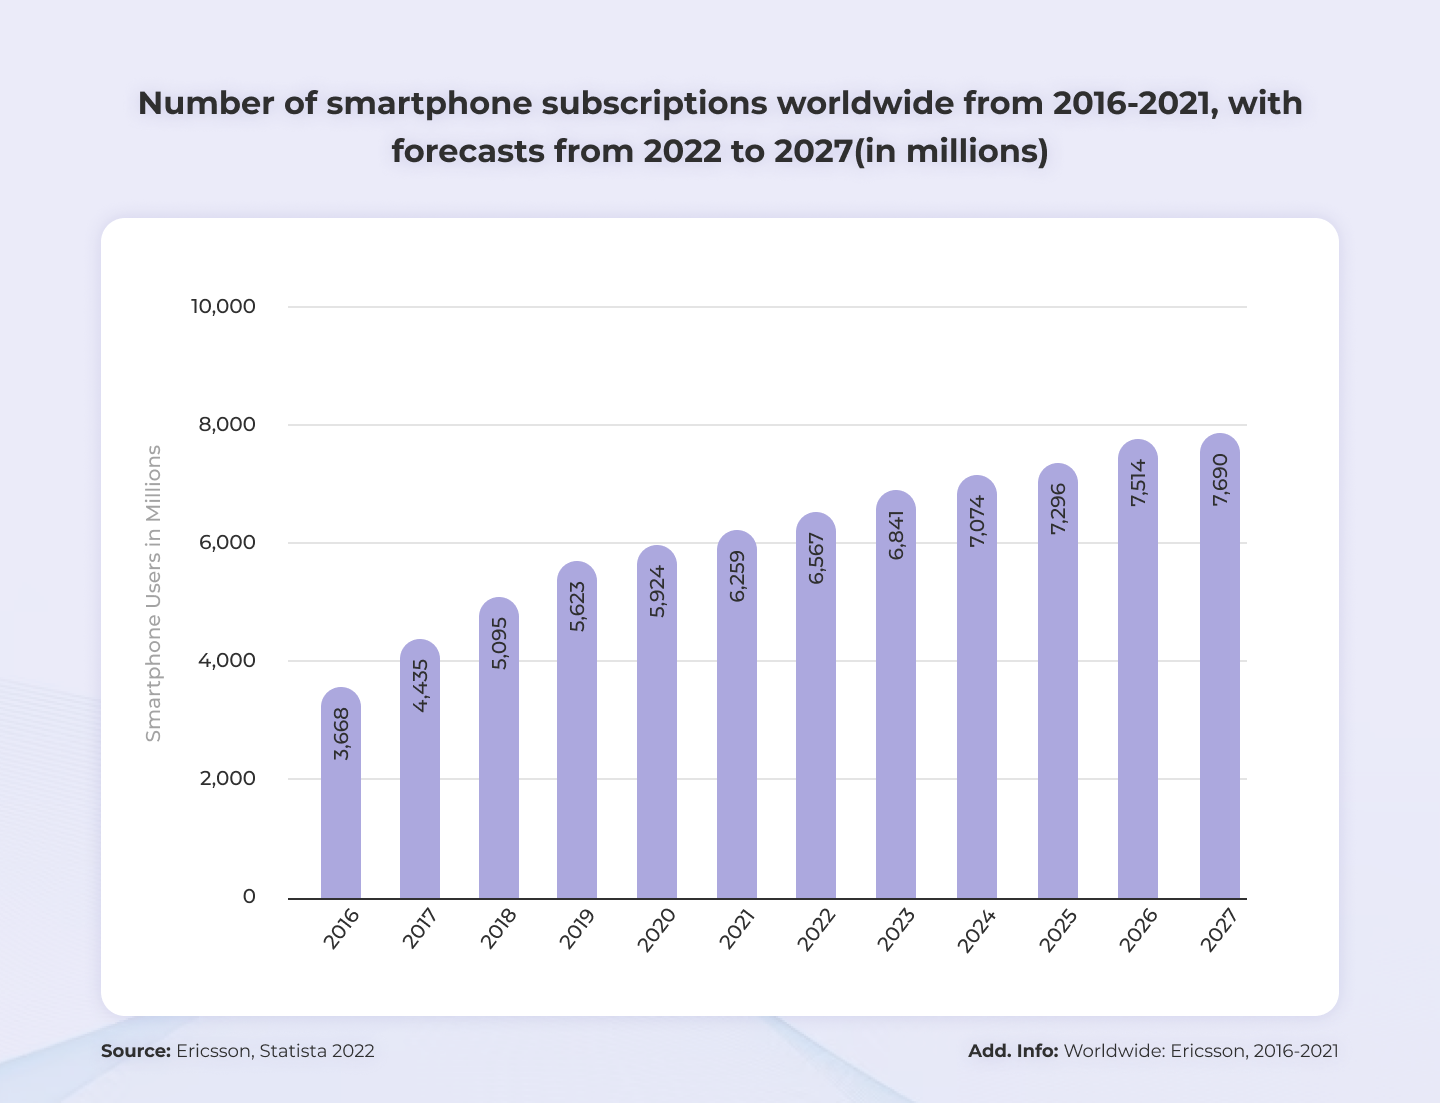
The number of smartphone users has been increasing rapidly over the years, and as a result, the demand for mobile applications has skyrocketed. Android, being one of the most widely used mobile operating systems, offers a vast opportunity for developers to create and distribute their applications. In this guide, we’ll walk you through the process of developing an Android app, step by step.
Step 1: Ideation
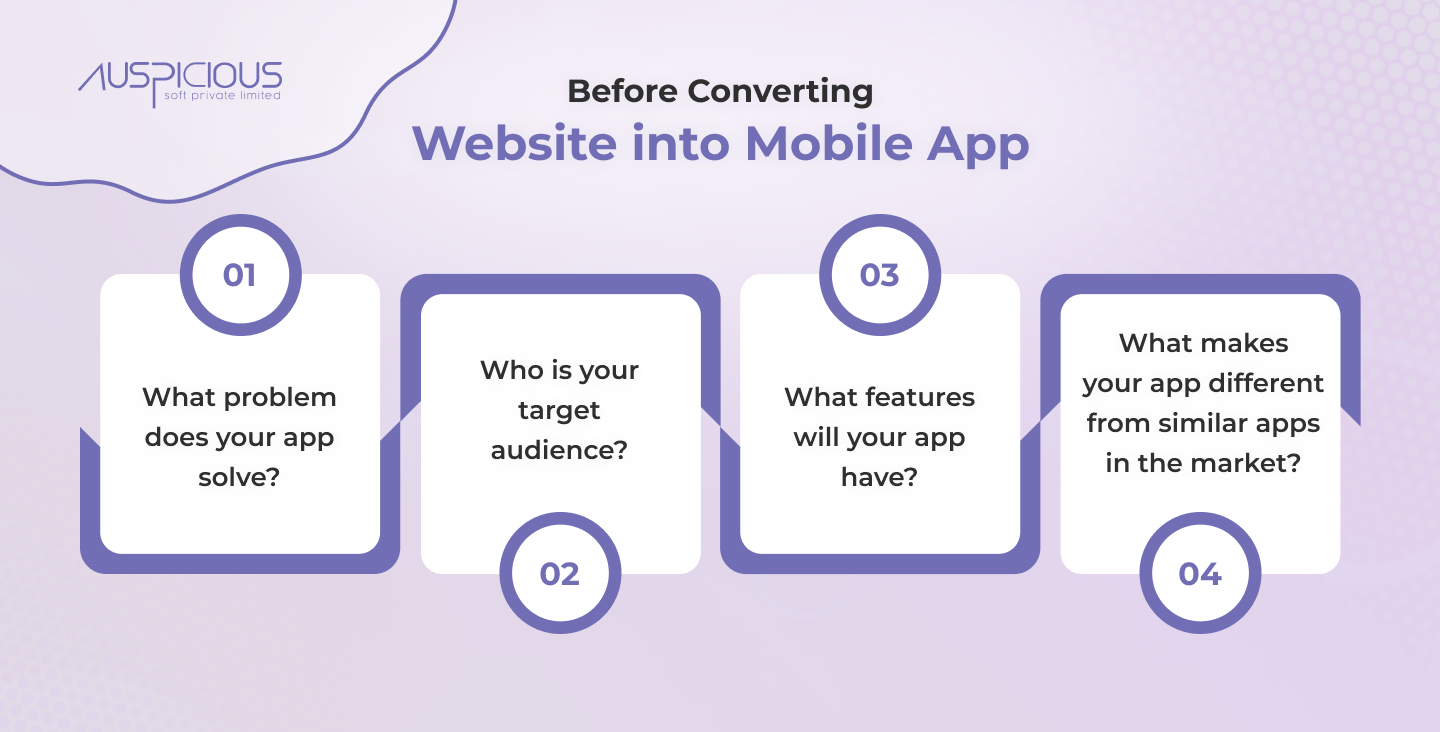
The first step in developing an Android app is to come up with an idea for your app. To do this, consider the following:
● What problem does your app solve?
● Who is your target audience?
● What features will your app have?
● What makes your app different from similar apps in the market?

Once you have a clear idea of what you want to achieve with your app, you can move on to the next step.
Step 2: Sketch Your App
Now that you have an idea of what your app will do, it’s time to start sketching it. This can be done on paper or using a wireframing tool. The goal here is to get a rough idea of the layout and flow of your app, so don’t worry about getting into the details just yet.
Step 3: Choose Your Development Environment
There are several tools and frameworks available for developing Android apps. Some popular options include:
● Android Studio:
This is the official integrated development environment (IDE) for Android app development, and it’s free to use.
● Xamarin:
This is a cross-platform development tool that allows you to create apps for Android, iOS, and Windows using a single codebase.
● React Native:
This is a framework for building native apps using React, a popular JavaScript library.
Choose the tool or framework that best fits your needs, taking into account factors such as cost, ease of use, and the features it offers.
Step 4: Design Your App
Once you have your sketches, it’s time to start designing your app. This includes creating user interface (UI) elements such as buttons, images, and text fields, as well as defining the color scheme, font, and overall style of your app.
Step 5: Code Your App
With your design complete, it’s time to start coding your app. This involves writing the code that brings your app to life, implementing the features you defined in the ideation stage.
Step 6: Test Your App
Testing is an essential part of the app development process. It helps you ensure that your app works as expected and fix any bugs or issues before it’s released. You can test your app using an emulator or a physical device.
Step 7: Publish Your App
Once your app is ready, it’s time to publish it to the Google Play Store. To do this, you’ll need to sign up for a Google Play Developer account, which costs a one-time fee of $25. Then, you’ll need to prepare your app for distribution by creating an APK (Android Package Kit) file, providing information about your app, and uploading it to the Google Play Store.
Step 8: Monitor And Update Your App
Once your app is live, it’s important to monitor its performance and make updates as needed. This includes responding to user feedback, fixing bugs, and releasing new features.
How Much Does It Cost To Convert A Website Into An Android App?
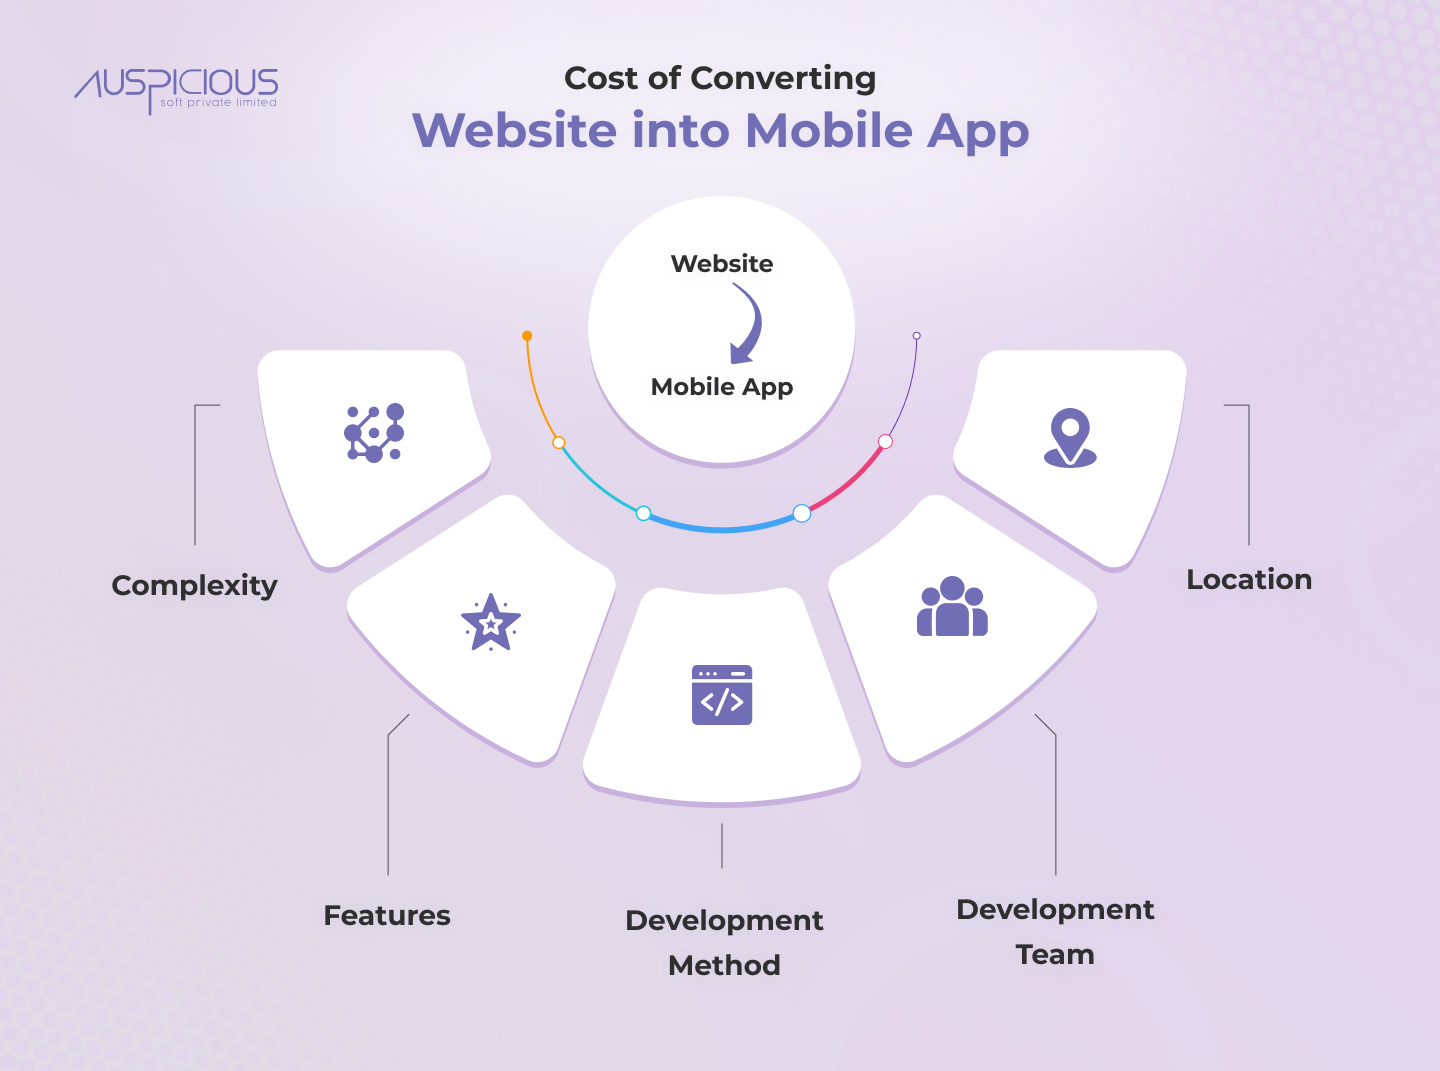
The cost of converting a website into an Android app varies based on several factors, including the complexity of the website, the features required, and the development method used. Here’s a more detailed look at what affects the cost of converting a website into an Android app.
● Complexity Of The Website
The complexity of the website is one of the biggest factors that affects the cost of converting it into an Android app. If the website is simple and straightforward, with basic features, it will likely cost less to convert it into an Android app. On the other hand, if the website is more complex, with a lot of features, it will be more expensive to convert into an Android app.
● Features Required
The features required for the Android app can also affect the cost. If you only need basic features, such as a mobile-friendly interface and the ability to access the website’s content, the cost will be lower. If you require more advanced features, such as push notifications, offline access, and the ability to access native device features, the cost will be higher.
● Development Method Used
The development method used can also affect the cost of converting a website into an Android app. There are several methods available, including:
Hybrid App Development: This method involves creating a mobile app that wraps a web-based solution, allowing the website to be accessed as an app. Hybrid app development is typically the most affordable option, as it requires less development time and effort.
Native App Development: This method involves creating an app that is designed specifically for the Android platform, using Java and the Android SDK. Native app development is more expensive than hybrid app development, as it requires more development time and effort.
Cross-Platform App Development: This method involves creating an app that can run on multiple platforms, including Android, iOS, and others. Cross-platform app development is typically more expensive than hybrid app development, but less expensive than native app development.
● Development Team
The development team you choose can also affect the cost of converting a website into an Android app. If you choose to work with a large, established app development company, you can expect to pay more. If you choose to work with a freelancer or a smaller development team, you may be able to save money.
● Location
The location of the development team can also affect the cost of converting a website into an Android app. Development teams located in countries with a lower cost of living will typically charge less than teams located in countries with a higher cost of living.
Based on these factors, the cost of converting a website into an Android app can range from a few thousand dollars to tens of thousands of dollars. On average, the cost of converting a website into an Android app ranges from $5,000 to $30,000, with most projects falling in the $10,000 to $20,000 range.
It’s important to note that the cost of converting a website into an Android app is not a one-time expense. After the app is developed, you will also need to invest in ongoing maintenance, bug fixing, and updates. Additionally, if you want to release your app on multiple platforms, such as iOS and Windows, you will need to incur additional costs.

Which App Development Company Is Best For Converting A Website Into An App?
There are many app development companies that specialize in converting websites into apps, and it can be difficult to determine which one is the best for your needs. However, the best app development company for you will depend on a number of factors, including the complexity of your website, the features you require in your app, your budget, and your timeline.
When choosing an app development company, it’s important to look for a company that has experience in converting websites into apps, as well as a strong portfolio of similar projects. Additionally, you should look for a company that offers a clear and transparent pricing structure, and that is able to provide a detailed timeline and project plan.
One company that you may consider is AuspiciousSoft, a leading app development company that specializes in converting websites into apps. AuspiciousSoft has a team of experienced developers who are knowledgeable in both web and mobile app development, and have successfully converted many websites into apps for a wide range of industries.
AuspiciousSoft offers a range of services, including website-to-app conversion, mobile app development, and mobile app design. They have a proven track record of delivering high-quality apps that meet the needs of their clients, and they offer a flexible and transparent pricing structure that makes it easy for clients to understand the cost of their project.
Conclusion
Converting a website into an Android app can be a valuable investment for both website owners and users. A native app provides a more optimized and seamless user experience, and having a presence in the Google Play Store can increase visibility and reach. By following the steps outlined in this article, you can convert your website into an Android app and take advantage of these benefits.
Additionally, the cost of converting a website into an Android app depends on several factors. To get a more accurate estimate of the cost, it’s best to reach out to app development companies or freelancers for quotes. Keep in mind that the cost of converting a website into an Android app

